
Sunday, November 4, 2012
Holiday Card Workshop - Day 2 part 2
I don't have much to say about these cards. I don't love them, but maybe I can pretty them up some.


Friday, November 2, 2012
Holiday Card Workshop - Day 2
As my dear friend Farley said...this card is complicated, any way you look at it :). So many things went wrong that i'm not going to bore you with the details. Anyway, the idea is that this ornament shape should be a window to the inside of the card. Mine is not. I just raised the panel on foam dots. Also, the snowflake is supposed to "float" over the opening but you can't really tell that it does on mine. COMPLICATED...probably won't make more of these, but that's the wonderful thing about this class. You can try new things and decide where your strengths and favorites are...this one won't go on either of those lists.

I haven't gotten around the the 2nd card for Day 2 yet...sit tight, i'll get er done.
Holiday Card Workshop - Day 1
Oh my...The Holiday Card Workshop from Online Card Classes started on Monday, but I had school commitments M & T, then Halloween on W, so I finally got to play on Thursday evening and I can't say i'm always thrilled with the results, but i'll keep trying.
These 2 cards were made with a wonderful stamp set from Penny Black called Foliage Fancy The sentiment on the left is from that same set and i'm not sure where the sentiment on the right is from. Anyhoo...I colored the leaves with colored pencils and tried my darndest to blend red and orange and i did ok i guess. the background paper is from Graphic 45 "on the Boardwalk". The leaf panels were inked with Wild Honey & Vintage Photo distress inks.

The next bunch of 3 looked great in my head but didn't translate to paper quite as well. I think they just look FLAT and that could be because they are. I'm thinking i will cut these cards down and use as a panel on another card so there is some depth. For what it's worth, here they are:

These 2 cards were made with a wonderful stamp set from Penny Black called Foliage Fancy The sentiment on the left is from that same set and i'm not sure where the sentiment on the right is from. Anyhoo...I colored the leaves with colored pencils and tried my darndest to blend red and orange and i did ok i guess. the background paper is from Graphic 45 "on the Boardwalk". The leaf panels were inked with Wild Honey & Vintage Photo distress inks.

The next bunch of 3 looked great in my head but didn't translate to paper quite as well. I think they just look FLAT and that could be because they are. I'm thinking i will cut these cards down and use as a panel on another card so there is some depth. For what it's worth, here they are:

Birthday greetings for a squirrely girl

Wednesday, October 31, 2012
Have a Creepy Halloween
I made several Halloween cards this year...some i like better than others :).
Below is a sampling of some of my favorites.
This might be my favorite. The scull stamp is from Red Lead and is heat embossed in glossy black
Border was cut from a piece of paper in my stash, but i'm sure there is a web border punch available (probably martha)
The sentiment is actually a combination of 3 stamps that I selectively inked and stamped using my stamp positioner in order to create the creepy message.
The spider was cut on my Silhouette. The paper is a variety from my stash.

This lovely card was for a dear friend who happens to have a birthday near Halloween. The center pendant and 2 embellishments are removable and wearable and interchangeable thanks to a magnet glued to the back of the pendant and washers glued on the back of the other discs.
Paper is DCWV Bella Armoire, Club Scrap & Martha Stewart

These two showcase my love of the AMC show, The Walking Dead & feature the bad-a** Daryl Dixon. They are macabre, but with a humorous twist.
Image and sentiments were created on the computer, printed and splattered with watered down red paint.
Paper is DCWV Bella Armoire (love this pad of paper!!)


I guess this is all i have available photos of right now.
Happy (Creepy) Halloween to All!
Monday, October 15, 2012
Squirrely Challenge - In The Middle from TJ
The fabulous Nancy from Squirrely Art challenged us squirrel girls with this cool and oh so easy technique from TJ and I gladly accepted! I have many holiday ideas in my head, so I can't wait to make more!

Paper: Club Scrap Wheel & Sprocket Purple, Kraft & White
Stamps: Club Scrap (sentiment) & uknown (birds)

Paper: Club Scrap Wheel & Sprocket Purple, Kraft & White
Stamps: Club Scrap (sentiment) & uknown (birds)
Tuesday, September 4, 2012
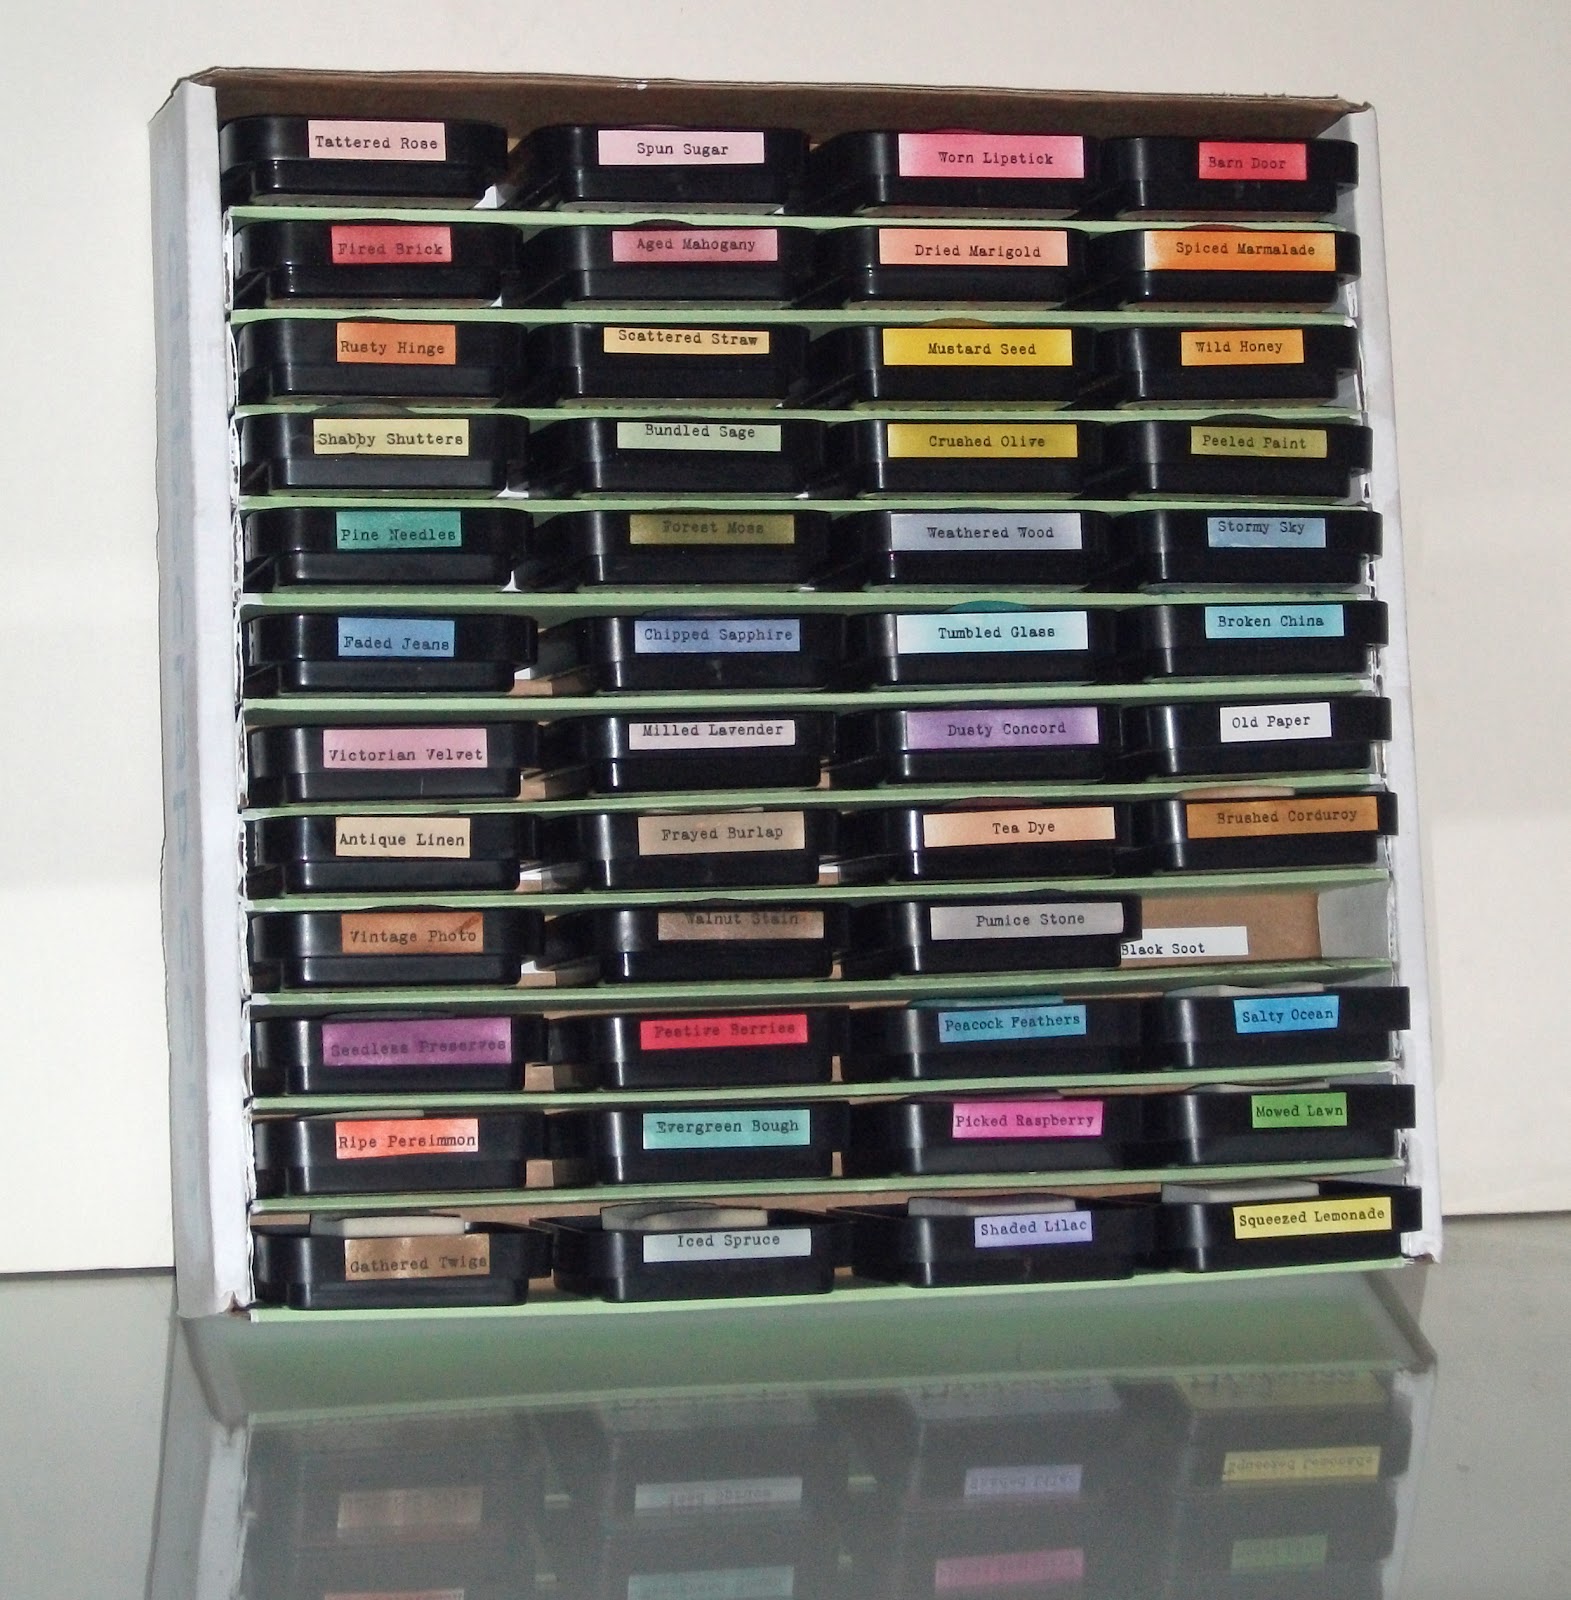
Ink pad storage out of 2 Club Scrap Pizza Boxes!
Those of us who have been monthly
members at Club Scrap for some time, have accumulated quite a collection of
their famous pizza boxes. I’ve used mine to store all kinds of things (tax
documents, wood mounted stamps, game pieces, and of course paper!). In
addition, I’ve used them for wrapping gifts of all kinds. Well, I have been
wanting to buy or make a storage box for my ink pads and so I played around one
night and came up with this. I’ve only just started using it, so I don’t know
how well it will hold up, but I love that all the inks are in one place and I
can easily see, remove and replace them. I’ve chosen to store the pads upside
down, because I found it easier to pull them out this way. I’ve also applied a
strip or two of ATG tape to the bottom side of each pad to hold the matching inking foam.
Monday, August 27, 2012
Friday Mash-Up #73
I was thinking about a couple techniques and the Friday Mash-Up challenge while in the shower (i do some of my best thinking there) and I had an inspiration to combine a few ideas. So, my thought was to sort of combine Triple Stamping technique with The TJ Embossed puzzle technique I did last week and make a Thank You card for The Friday Mashup Challenge #73. Here is the result:
Paper: Club Scrap: Blue panel-Gimme A Ring, White panels-Lotus Pond
Embossing Folder: Sizzix Tropical Paisley
Inks: Hero Arts: Pool & brown, Chipped Sapphire Distress Ink
Sentiment: Unknown
Punch: Butterfly
Other: perfect pearl spray


Paper: Club Scrap: Blue panel-Gimme A Ring, White panels-Lotus Pond
Embossing Folder: Sizzix Tropical Paisley
Inks: Hero Arts: Pool & brown, Chipped Sapphire Distress Ink
Sentiment: Unknown
Punch: Butterfly
Other: perfect pearl spray
Friday, August 24, 2012
Squirrely Challenge - Embossed Puzzle
Not much time to write, but Miss Nancy at Squirrely Art tasked us squirrel girls with trying out the TJ technique called Embossed puzzle...and here is what i came up with.

Embossing Folder: Darice
Distress Inks: Peacock Feathers, Picked Raspberry, Mowed Lawn, Squeezed Lemonade & Black Soot
Paper is Club Scrap
Button from stash.
Have a good night!

Embossing Folder: Darice
Distress Inks: Peacock Feathers, Picked Raspberry, Mowed Lawn, Squeezed Lemonade & Black Soot
Paper is Club Scrap
Button from stash.
Have a good night!
Wednesday, August 8, 2012
Squirrely Challenge - TJ Technique/Distressed Spritzing
Not much time to write tonight. Literally rushed this card together in about 20 minutes. No frills, but needed for a birthday.
Playing along with Nancy's Squirrely challenge as well as The Play Date Cafe #144. Perhaps i should have used a different stencil since you can hardly tell that a flower stencil was used to create the background. Oh well, I gave this TJ technique a shot! I used Distress Inks (Spun Sugar, Worn Lipstick & Barn Door) for the background. I stamped the flowers in Club Scrap's India Ink...i think the flowers and sentiment are from SU Garden of Life stamp set. I used Distress Markers (Mustard Seed & Wild Honey) to fill in the centers and Worn Lipstick to darken up the flowers.


Playing along with Nancy's Squirrely challenge as well as The Play Date Cafe #144. Perhaps i should have used a different stencil since you can hardly tell that a flower stencil was used to create the background. Oh well, I gave this TJ technique a shot! I used Distress Inks (Spun Sugar, Worn Lipstick & Barn Door) for the background. I stamped the flowers in Club Scrap's India Ink...i think the flowers and sentiment are from SU Garden of Life stamp set. I used Distress Markers (Mustard Seed & Wild Honey) to fill in the centers and Worn Lipstick to darken up the flowers.

This week's suggested colors are:
Pink Carnation
Orange Sherbet
Lemonade
Subscribe to:
Posts (Atom)